When an office chair sinks under your weight or refuses to stay at the height you set, the gas cylinder is often the first part worth checking. Replacing the cylinder can be much cheaper than replacing an otherwise good chair, and the repair is usually straightforward if you use the correct replacement and work carefully.
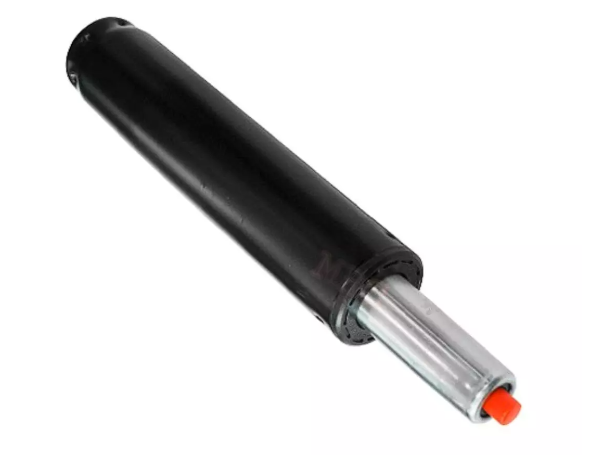
Safety first
Office chair gas cylinders are sealed and pressurised. Never puncture, drill into, saw, open, or apply heat to a cylinder. Replace the complete cylinder as a sealed unit. Wear eye protection and work gloves, and keep the cylinder away from flames or other heat sources.
How the gas cylinder works
The gas cylinder sits between the chair's five-star base and the mechanism underneath the seat. When you operate the height lever, it activates a valve on the cylinder. This allows the seat to move up or down and holds the seat at the selected height when the lever is released.
Over time, the internal seals can wear and the cylinder may stop holding pressure properly. The most obvious symptom is a chair that slowly sinks while you are sitting in it. If the rest of the chair is still in good condition, replacing the cylinder can restore the height adjustment without replacing the entire chair.
For a more detailed explanation of the component itself, see our office chair gas cylinder guide .
Step 1: Choose the right replacement cylinder
Before removing anything, make sure the replacement cylinder is suitable for your chair. Many replacement cylinders are designed around common office-chair dimensions, but you should not assume that every cylinder will fit every chair.
Check the following:
- Top taper: Check the diameter and shape of the section that fits into the seat mechanism.
- Bottom taper: Check the section that fits into the five-star base.
- Overall length: The length affects the minimum and maximum height of the finished chair.
- Stroke: This determines how much the cylinder can extend and retract.
- Weight rating: Choose a cylinder suitable for the person using the chair and the chair's intended load.
If you are unsure about the required dimensions, compare the replacement listing with the old cylinder and the chair manufacturer's specifications where available.
Step 2: Prepare the chair
Move the chair to an open area where you have enough room to work. A garage, workshop, or clear floor is ideal. Protect the floor with cardboard, an old blanket, or another soft surface.
- Raise the chair to a comfortable working height if it still adjusts.
- Remove anything from the chair that could fall or get damaged while you work.
- Turn the chair carefully onto its side or upside down.
- Make sure the chair is stable before attempting to loosen the cylinder.
Step 3: Separate the chair from the base
The cylinder normally sits in tapered sockets rather than being bolted directly to the chair. Years of body weight and normal use can make these connections extremely tight.
Start by separating the cylinder from the five-star base. A rubber mallet can be used to tap the base around the cylinder connection while supporting the chair properly. Work gradually rather than trying to force the joint apart with one large impact.
Once the cylinder is free from the base, you can work on the connection between the cylinder and the seat mechanism.
Step 4: Remove a stuck cylinder
Some cylinders come out easily. Others can be surprisingly difficult, especially on an older chair that has been used for several years.
For a stubborn cylinder, use a pipe wrench or large adjustable wrench to grip the cylinder body. Protect the surface with a cloth if you want to reduce cosmetic damage. Twist the cylinder gradually while pulling it away from the mechanism.
A small amount of penetrating oil around the external joint can sometimes help loosen a stubborn connection. Give it time to work rather than immediately applying excessive force.
Do not try to open the cylinder
The old cylinder is still a sealed pressurised component. Do not drill it, cut it, puncture it, weld it, crush it, or heat it to make removal easier. The goal is to remove the complete cylinder without damaging or opening the pressure vessel.
Step 5: Remove the cylinder cover
Many office chairs have a plastic telescopic cover around the gas cylinder. If your old cylinder has one, remove the cover before installing the replacement.
Depending on the chair, the cover may slide off the cylinder or separate into several sections. Keep the pieces together so you can reinstall them in the same orientation.
Step 6: Install the new gas cylinder
- Place the new cylinder into the five-star base with the correct end facing downward.
- Make sure the tapered section is seated properly in the base socket.
- Slide the plastic cylinder cover into position if your chair uses one.
- Lower the seat mechanism onto the top of the new cylinder.
- Check that the cylinder is sitting straight and the mechanism is properly aligned.
The tapered connections normally become firmly seated through the chair's weight and normal use. You generally do not need to add bolts or modify the cylinder.
Step 7: Turn the chair upright and test it
Carefully return the chair to its normal upright position. Before using it normally, check that the base, cylinder, and seat mechanism are properly aligned.
Operate the height lever and check that:
- The seat rises smoothly.
- The seat lowers smoothly.
- The cylinder holds the seat at the selected height.
- The chair remains stable when you sit down.
- The seat mechanism does not wobble excessively.
Test the chair carefully before returning to normal daily use.
Why does an office chair cylinder fail?
Gas cylinders can eventually lose their ability to hold pressure because their internal seals and components wear with use. The amount of time before failure varies considerably depending on the chair, cylinder quality, user weight, frequency of use, and operating conditions.
A chair that gradually sinks during normal sitting is one of the clearest signs that the cylinder may need replacement. Other parts can also cause height-adjustment problems, however, so check the lever and mechanism before ordering a replacement if the symptoms are unclear.
Can you repair a gas cylinder instead of replacing it?
In normal home maintenance, replacing the complete cylinder is the sensible approach. The cylinder is a sealed pressurised component and is not designed to be opened and rebuilt by the average chair owner.
A replacement cylinder is generally simpler and safer than attempting to dismantle the old pressure vessel. If the cylinder has failed, replace the complete unit rather than trying to repair its internal seals yourself.
Disposing of the old cylinder
Do not put the cylinder near a fire and do not attempt to cut it open before disposal. Treat it as a sealed pressurised metal component.
Check your local waste or recycling guidance for the correct way to dispose of pressurised metal components. A suitable scrap-metal or recycling facility may be able to accept it depending on local rules.
Tools you may need
You do not need a large collection of specialised equipment for this repair. Having the right tools available before starting makes the job considerably easier.
- Rubber mallet
- Pipe wrench or large adjustable wrench
- Cloth or rag for protecting surfaces
- Eye protection
- Work gloves
- Penetrating oil for stubborn external joints
How long does the replacement take?
For a straightforward chair, the actual replacement can be relatively quick. The part that usually takes the most time is removing the old cylinder, particularly if it has been tightly seated for years.
Give yourself enough space and avoid rushing the removal process. Working slowly is better than damaging the chair base, mechanism, or replacement part.
When should you replace the whole chair instead?
A new cylinder makes sense when the rest of the chair is still in good condition. However, if the five-star base is cracked, the seat frame is damaged, the mechanism is badly worn, or several major components are failing at the same time, repairing one component may not be worthwhile.
In that situation, compare the cost of the required parts with the cost of a replacement chair. Our buying guides can help if you decide that replacing the chair makes more sense.
Conclusion
Replacing an office chair gas cylinder is one of the more practical repairs you can make when an otherwise good chair starts sinking. Choose a compatible replacement, prepare a safe workspace, remove the old cylinder without opening or damaging it, install the new cylinder into the tapered connections, and carefully test the chair before normal use.
The most important safety rule is simple: never puncture, cut, drill, open, crush, or heat the gas cylinder. Treat it as a sealed pressurised component and replace it as a complete unit. With the right replacement and a little patience, a sinking office chair can often be brought back to normal without replacing the entire chair.